Dado blades designed for table saws produce much broader cuts in the wood than ordinary saw blade cuts.
And if you are wondering how to install a dado blade on a table saw, you have come to the right spot.
By modifying the blade or the number of cutters you use, you can change the dado blade to manage the breadth. Your technique will depend on the set of dado blades for the table saw.
Check the dado blade instructions and your table saw because not all table saws are dado blade compatible.
So, let’s dive into the article and see how to install a dado blade on a table saw.

How to Install a Dado Blade on a Table Saw? | An Introduction!
First, let’s see the use of a dado blade.
In woodworking, dado cuts are a relatively common type of cuts. A dado is a crosscut against the wood grain; in contrast to a groove cut produced, the dado cut is perpendicular (90-degree angle) to the wood grain.
It has interlocking applications and is frequently used to attach shelves to cabinets. Making dado cuts with a table saw is very effective and quick.
Compared to other techniques, it also quickly cuts flawless joints and grooves.
Types of Dado Blades
There are two kinds of dado blades: stacking and wobbling dado blades.
- The wobble dado blade has a single blade that rotates at an angle. Spinning these plates allows you to control the amount of lead on the blade and create a custom cut.
- A set of blades consisting of outer blades, a chipper, and a spacer is a stacked dado blade. Blades can be spaced apart by spacers to make a precise cut. Chipper blades can be added or subtracted from the outer blades, and the length of the cut can be decided by the chippers, depending on your desired cut width.
Stackable dado blades are popular among woodworkers due to their excellent efficiency and adaptability. So, this article will cover a guided tour for installing stacking dado blades due to their wider usability.
Related article: How to Square Lumber with a Table Saw? (Step-by-Step Process!)
Size of Dado Blades
The dado set’s outer blades usually are 1/8 inches thick and 8 inches in diameter.
The chippers have a thickness of 1 1/16 inches, 1 3/32 inches, and 4 1/8 inches. The width options are essentially unlimited, given the variety of sizes.
How to Install a Dado Blade on a Table Saw? | A Step-by-Step Guide!
Let’s jump into the stepwise guide on how to install a dado blade on a table saw.
Step 1: Know Your Set of Dado Blade for the Table Saw
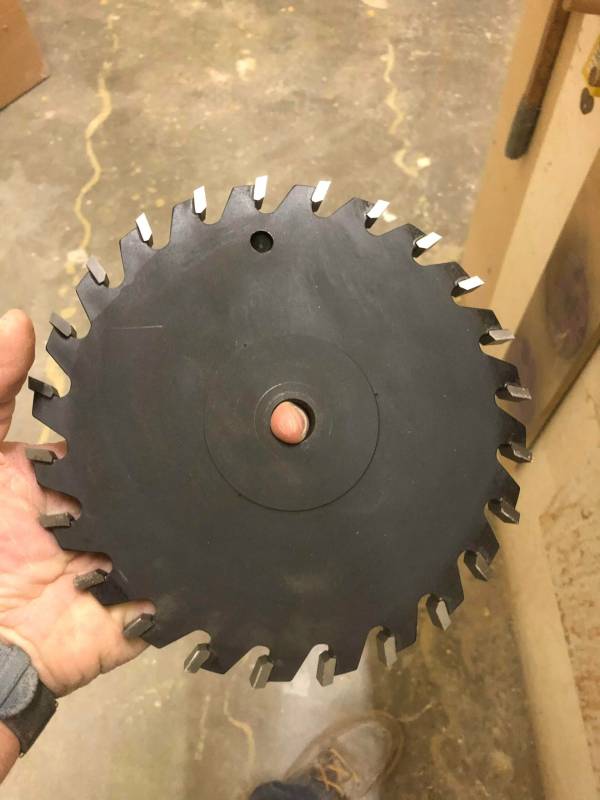
Every set of dado blades consists of two outer blades, which have many teeth and usually feature text on one side.
Please take the time to study the text on these blades, as it will indicate which way they should be put.
Every set of dado blades usually requires that the writing side be installed facing the outside of the stack.
To ensure a secure installation, read the dado set exterior blade instructions.
Chippers:
These blades typically have between 2 and 4 teeth and come in various widths, depending on the brand. Five chipper blades with varying widths and four teeth came with my dado stack.
When placed, these blades will fit in between your outer blades and will let you change the cut’s breadth.
Spacers:
You can adjust the width of your cut with the help of these tiny tools. A dado stack often includes spacers of various widths.
Step 2: Select the Proper Size of the Dado Blade for the Table Saw
You can follow these simple steps:
- Lay a piece of wood the same width as the piece you will insert into the dado joint on a flat surface to calculate the width of the dado cut for your project.
- After placing one outside blade on the bottom, begin stacking the chipper blades.
- Ensure that the chipper blades alternate with the outer blade’s teeth and that they are not touching each other.
- Spread out the spacers for an even cut if you add more than a few to the stack.
- Check the height of the stack and the wood by placing the final outside blade on top of the stack.
- Once you have your height, you may decide which size of blades to install.
Dado blades are designed with an 8-inch diameter for 10-inch saws because they are not intended for fussy cuts.
Additionally, blades with diameters of 6 and 7 inches are also available.
Step 3: Install the Blades
Remove your standard table saw blade before installing the new dado blades.
Make sure there are at least two or three threads exposed after installing the dado stack so that there are enough threads for the nut to be tightened appropriately.
When in doubt, leave a lot of threads to tighten the stack.
Instead of having a loose set of dado blades in a highly unsafe condition, making two passes with a little stack is preferable.
The width of the stack you can fit on your saw may be significantly different from what someone else can hold because arbor lengths on saws vary greatly.
- As instructed in the blade’s guidelines, install your first outer blade in the proper position.
- Install the chippers and spacers next (if necessary), and ensure that the teeth are alternating and not contacting one another.
- Install the second outer blade at last.
- Confirm if it is oriented correctly, and tighten it.
- Use a piece of scrap wood to wedge the blades together and prevent them from spinning.
- When using a dado stack blade, avoid narrowing using the arbor stop on your saw. Although it will stop the arbor from shifting, it will not prevent the inner blades from messing up.
See this video reference for further information on these cuts:
Summary
As you’ve read this article on how to install a dado blade on a table saw, you can now easily assemble a set of dado blades for your table saw.
All you need is to know the blade required for your table saw, stack the blades as per your preference, and tighten them.
Or, follow the dado blade instructions written on the side of the blades.
I hope you find today’s article helpful. If so, don’t forget to share it with people. Also, feel free to comment any query down below.
Regards.