Learning how to transplant a Japanese maple is quite a task. To get it correctly, you’ll need a little bit of specialist expertise. Given the slow growth rate of Japanese maples or acers, it’s well worth following this advice.
Suppose you’ve been learning to cultivate acers and have a particularly lovely specimen that you’re moving to a new garden or a new position in an existing garden. In that case, you’ll need to do it well to avoid your tree becoming sick or dying.
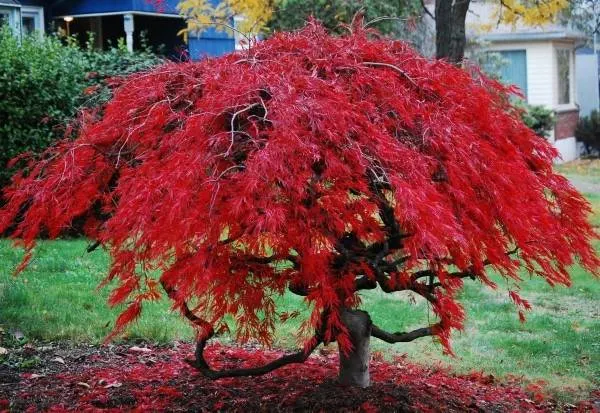
Japanese maple trees, also known as Acer palmatum, are modest, beautiful trees with brightly colored leaves that dangle from complex limbs, giving them a delicate, frilly appearance.
These hardy trees are compact and attain a height of 6-8 feet, making them excellent for planting beside entryways and sidewalks.

A Garden Guide on How To Transplant A Japanese Maple
Japenese maples are easier to transplant, but they grow slowly, ensuring the tree’s latest home is permanent since moving it too often could damage the tree’s slowly regenerating root system.
Acers are remarkably easy to care for, but transplantation is a different story, and it should be undertaken with caution for the best results. Here’s what a tree expert has to say about how to transplant a Japanese Maple.
Safety First
As with all transplantation, the first thing to do is ensure your safety from skin irritations and infections. The root bark of Japanese maples contains a compound known as urushiol, which may cause dermatitis in some people. It’s never a bad idea to wear gloves.
For peace of mind, you can take a simple anti-histamine tablet to reduce the possibility of an allergic reaction.
- To lessen transplanting stress, transplant it in late winter or fall since it’s dormant. When you transplant a tree with leaves, it is considerably more difficult on the tree.
- Choose a good location for your tree’s new home. Japanese maples prefer well-drained soil and should be planted in partial shade or full sun. Avoid spots that receive a lot of direct sunlight or reflect heat in abundance. Sun exposure to the east is often preferable to that to the west. If you have to put the tree in a poorly drained area, first treat the soil with compost or other organic material.
- It would be best if you dug around the root ball without completely displacing it, creating an overlap of upto 5 inches (12 cm). Dig a huge trench around the tree where the root balls are terminating. Cut neatly through the roots you come across with a sharp spade or trowel. To help the dwarf Japanese maple’s shallow rooting system take hold, the root ball must be one foot wide per 18 inches of height, and you should dig a hole four times as large as the root ball.
- Remember that you shouldn’t stand directly behind your tree when working because acers produce a fine powder that can irritate the respiratory system. Treating the soil with organic mulch will help prevent this irritant from becoming airborne.
- Use twine or rope to tie the tree’s branches up.
- Place the shovel’s edge beneath the tree after digging the trench around it; carefully remove the root ball from the soil, working your way around it.
- Remove the root ball from the earth and set it in the previously dug hole. Wrap the root ball in burlap to transport it if it’s falling apart or if you’re transferring it at a long distance.
- You’ll need to dig a hole that’s exactly as wide as the root ball, and you must ensure it’s not deeper than the tree is tall.
- Remove the burlap and backfill the hole with the root ball. It can be very easy to bury your tree deeper than it ought to be if you’re distracted or rushing. If this happens, cut through the roots with a sharp spade and put your tree back in at the right depth. Completely refill the hole with soil and pat down, but never pack it down hard; otherwise, you risk killing your Acer.
- Watering well after transplanting is an effective way to settle the soil properly around your tree. You can then mulch around the base of your tree at a depth of 2-3 inches to help retain moisture and keep weeds down.
- After planting, unfasten the tree’s branches and properly water the tree. After transplanting, for the first few years, provide constant watering to ensure optimum root development. The survival of the dwarf Japanese maple depends on adequate and consistent irrigation.
- You can also place a tarpaulin over the newly transplanted tree to protect it from damage, particularly during windy conditions.

Care Guide Post Transplantation
Japanese maples are vulnerable to various pests and diseases, eager for a way into the heart of your garden. It’s wise to include a protective barrier by wrapping mesh or other material around the trunk of your transplanted Acer.
Water your dwarf Japanese maple at least one inch per week. If it doesn’t rain that much in your area, you’ll need to water the tree yourself.
Keep watch for any yellow leaves falling off, which may indicate that your tree is experiencing drought stress and needs more water. Water slowly so saturates the soil completely rather than running right off the top of the soil.
Transplant your new tree every few years if needed. If you notice that the root ball is becoming too large or weeds are developing around your tree, transplanting is necessary.
Dig into a slightly larger hole to place the root ball in and gradually fill it with fresh topsoil until only the outermost branches and leaves are uncovered.
If you live in an area where the ground freezes, plant your new tree near a south-facing wall that will help to collect heat and provide warmth throughout winter. This way, your tree can stay healthy and alive even through harsh winters and snowfall.
It’s best to transplant your maple in early spring before the leaves have appeared. This way, the roots are still dormant and won’t be disturbed once they start growing.
You can also plant during summer or autumn if you follow certain steps to protect your tree from extremely cold temperatures.
Final Remarks
Learning how to transplant a Japanese maple is no mean feat, and you must take the time to do it right. The treatment your tree gets during and after this process can greatly affect how well it weathers the transplantation and adjusts to its new environment.
As always, prevention is better than cure; it’s well worth taking the time to prepare your tree before you transplant it.
Like most plants, maples are much tougher when young, and they should therefore only be transplanted during their first five years of growth.
You can tell when your tree is coming to the end of its first five years by looking at the trunk. If it has developed a bark ridge, you should move your Acer as soon as possible and take special care when transplanting it.